2023.07.23 - [Flask] - Flask 이용한 웹사이트 제작기 (7) - blog blueprint 추가
Flask 이용한 웹사이트 제작기 (7) - blog blueprint 추가
2023.07.22 - [Flask] - Flask 이용한 웹사이트 제작기 (6) - static file 추가 Flask 이용한 웹사이트 제작기 (6) - static file 추가 2023.07.21 - [Flask] - Flask 이용한 웹사이트 제작기 (5) - 기본 template 구현 Flask 이용
donot-simsim.tistory.com
에서 이어짐.
https://flask.palletsprojects.com/en/2.3.x/tutorial/install/
이 부분을 할 차례인데. 비록 듀토리얼에서는 후반부에서 설명하고 있지만, 실제 flask app 만들 때에는 가장 선행되어야 할 작업이라고 한다. 환경을 미리 맞춰두고, dependency 맞추는 일이니.
늦었지만 진행해 보고, 전에 만든 코드들에 대한 test code까지 작성해보자.
- Describe the Projcet, Install the Project
// pyproject.toml

[project]
name = "flaskr"
version = "1.0.0"
description = "The basic blog app built in the Flask tutorial."
dependencies = [
    "flask",
]

[build-system]
requires = ["flit_core<4"]
build-backend = "flit_core.buildapi"
이렇게 project에 대한 정보들을 toml에 작성해 둔 후
아래와 같은 명령어를 작성해, virtual environment에 내가 만든 프로젝트를 설치하자.
pip install -e .
그 후 pip list를 하면, 현재 설치된 pip list를 볼 수 있다.
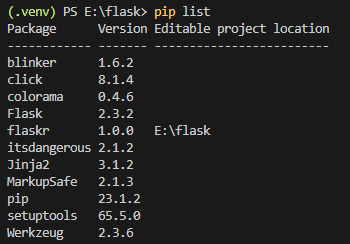
이렇게 세팅하고 난 뒤에는, flask 가 깔린 디렉토리가 아니어도, 어디에서든지 virtual env만 구동되어 있다면 flask를 구동시킬 수 있다고 한다.

- Test Coverage
사실 테스트 코드는 flask에서 필수적인 요소는 아니다. 다만 프로젝트가 커지다 보면 나도 모르는 버그가 생길 수도 있으니, 안정성을 위하여 / 추후 리팩토링을 위하여 미리미리 테스트 코드를 작성해 두면 득이 되면 되지, 실이 될 일은 절대로 없을 것이다.
다만 여기서 모든 코드들의 테스트 코드를 만든 것은 무리가 있으니, 한 두개정도만 만들어 보면 될 듯 하다.
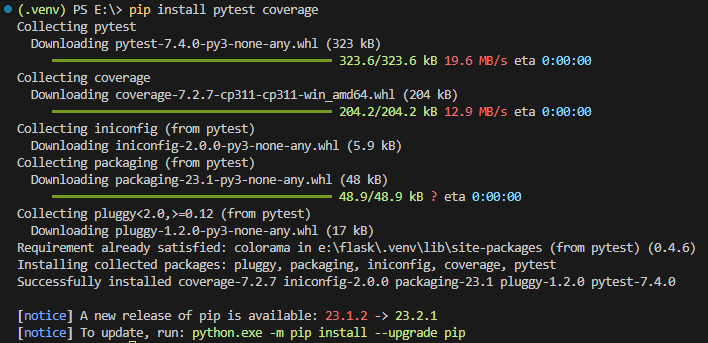
일단 unittest 를 위한 package 먼저 다운받아 두자.
pip install pytest coverage
- Setup and Fixtures
test 폴더는 flaskr 폴더 안에 있으면 안되고, flaskr 폴더 옆에 있어야 한다고 한다. 그것만 주의해서 만든 후, 필요한 세팅을 미리 한거번에 해 두자.
// tests/data.sql

INSERT INTO user (username, password)
VALUES
  ('test', 'pbkdf2:sha256:50000$TCI4GzcX$0de171a4f4dac32e3364c7ddc7c14f3e2fa61f2d17574483f7ffbb431b4acb2f'),
  ('other', 'pbkdf2:sha256:50000$kJPKsz6N$d2d4784f1b030a9761f5ccaeeaca413f27f2ecb76d6168407af962ddce849f79');

INSERT INTO post (title, body, author_id, created)
VALUES
  ('test title', 'test' || x'0a' || 'body', 1, '2018-01-01 00:00:00');
// tests/conftest.py
import os
import tempfile

import pytest
from flaskr import create_app
from flaskr.db import get_db, init_db

with open(os.path.join(os.path.dirname(__file__), 'data.sql'), 'rb') as f:
    _data_sql = f.read().decode('utf8')


@pytest.fixture
def app():
    db_fd, db_path = tempfile.mkstemp()

    app = create_app({
        'TESTING': True,
        'DATABASE': db_path,
    })

    with app.app_context():
        init_db()
        get_db().executescript(_data_sql)

    yield app

    os.close(db_fd)
    os.unlink(db_path)


@pytest.fixture
def client(app):
    return app.test_client()


@pytest.fixture
def runner(app):
    return app.test_cli_runner()
이렇게 test용 db를 만들고, app을 create 할 때, TESTING 옵션을 true로 주어 flask에 현재 test 중이라고 알려 준다.
- Factory Test
from flaskr import create_app


def test_config():
    assert not create_app().testing
    assert create_app({'TESTING': True}).testing


def test_hello(client):
    response = client.get('/hello')
    assert response.data == b'Hello, World!'
사실 factory 코드에서는 그렇게 테스트 할 부분이 많지 않다고 한다. 실제 테스트 코드를 봐도, 딱히 하는게 없다. 초반에 확인용으로 만들어 둔 /hello route에 들어갔을 때, 정상적으로 데이터가 돌아오는지 정도?
- Database
app context에서, get_db는 항상 같은 연결을 가지고 있어야 하고, 끝날 때 이 connection은 종료되어야만 한다. 이 요구사항을 가지고 테스트 코드를 만들자.
// tests/test_db.py

import sqlite3

import pytest
from flaskr.db import get_db


def test_get_close_db(app):
    with app.app_context():
        db = get_db()
        assert db is get_db()

    with pytest.raises(sqlite3.ProgrammingError) as e:
        db.execute('SELECT 1')

    assert 'closed' in str(e.value)

def test_init_db_command(runner, monkeypatch):
    class Recorder(object):
        called = False

    def fake_init_db():
        Recorder.called = True

    monkeypatch.setattr('flaskr.db.init_db', fake_init_db)
    result = runner.invoke(args=['init-db'])
    assert 'Initialized' in result.output
    assert Recorder.called
pytest의 monkeypatch라는 fixture를 이용하여, init_db가 불릴 때, fake_init_db가 불리게끔 함수를 바꿔지기 해 주었다. cpp에서 gtest 쓸 때의 mocking과 비슷한 맥락인 것 같은데.. 확실히 python이 편하긴 하구나.
- Authentication
이 다음부턴 본체 코드들이다. 예시로 계정 관련 코드 중 몇개에 대해서만 테스트 코드를 작성해 보자.
// tests/conftest.py

class AuthActions(object):
    def __init__(self, client):
        self._client = client

    def login(self, username='test', password='test'):
        return self._client.post(
            '/auth/login',
            data={'username': username, 'password': password}
        )

    def logout(self):
        return self._client.get('/auth/logout')


@pytest.fixture
def auth(client):
    return AuthActions(client)
auth 부분을 테스트하려면, negative test 몇 가지를 제외하고는 다 로그인이 되어있는 상태여야 한다. 매번 테스트 코드를 작성할 때 마다 login / logout을 할 수 없으니, 시작하고 끝날 때 자동으로 login / logout을 할 수 있게끔 위와 같이 AuthActions class를 하나 만들었다.
그리고 하나하나 상황에 맞는 테스트 코드를 작성해준다.
// tests/test_auth.py

import pytest
from flask import g, session
from flaskr.db import get_db


def test_register(client, app):
    assert client.get('/auth/register').status_code == 200
    response = client.post(
        '/auth/register', data={'username': 'a', 'password': 'a'}
    )
    assert response.headers["Location"] == "/auth/login"

    with app.app_context():
        assert get_db().execute(
            "SELECT * FROM user WHERE username = 'a'",
        ).fetchone() is not None


@pytest.mark.parametrize(('username', 'password', 'message'), (
    ('', '', b'Username is required.'),
    ('a', '', b'Password is required.'),
    ('test', 'test', b'already registered'),
))
def test_register_validate_input(client, username, password, message):
    response = client.post(
        '/auth/register',
        data={'username': username, 'password': password}
    )
    assert message in response.data


def test_login(client, auth):
    assert client.get('/auth/login').status_code == 200
    response = auth.login()
    assert response.headers["Location"] == "/"

    with client:
        client.get('/')
        assert session['user_id'] == 1
        assert g.user['username'] == 'test'


@pytest.mark.parametrize(('username', 'password', 'message'), (
    ('a', 'test', b'Incorrect username.'),
    ('test', 'a', b'Incorrect password.'),
))
def test_login_validate_input(auth, username, password, message):
    response = auth.login(username, password)
    assert message in response.data

def test_logout(client, auth):
    auth.login()

    with client:
        auth.logout()
        assert 'user_id' not in session
어우 길다...
- Running the Tests
작성이 끝나면, pyproject.toml에 아래와 같은 설정을 추가해준다.
// pyproject.toml

[tool.pytest.ini_options]
testpaths = ["tests"]

[tool.coverage.run]
branch = true
source = ["flaskr"]
우리가 만든 tests 폴더를 testpath로 정하고, source를 flaskr 폴더로 정해준다.
그 후 pytest command를 통하여 test를 진행시키면!
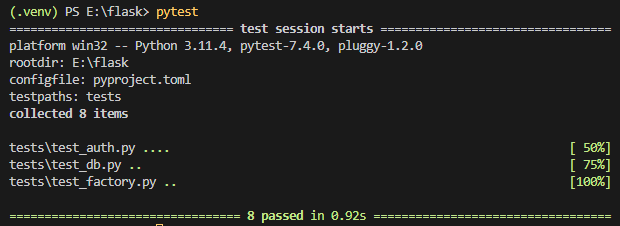
이렇게 test 결과를 볼 수 있다!
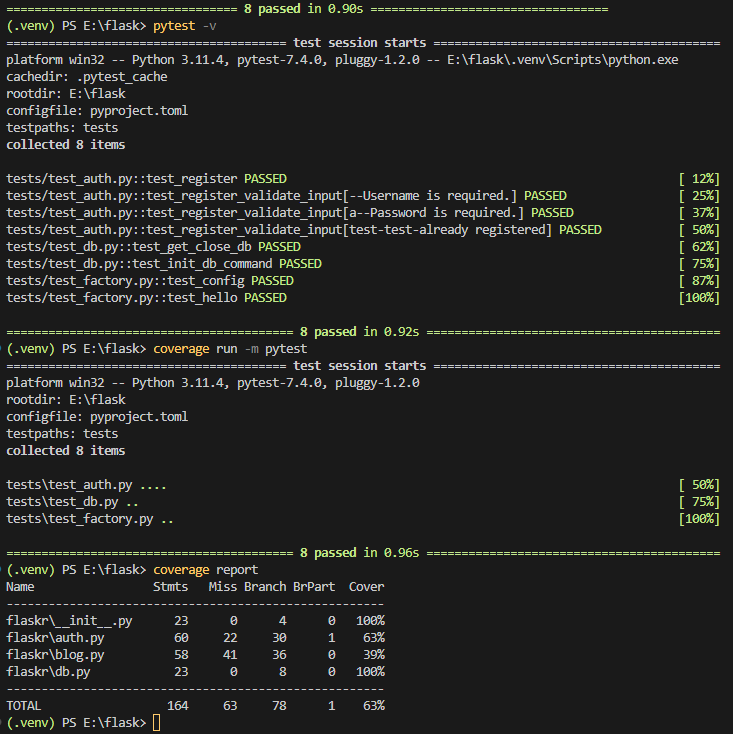
이런 식으로 여러 옵션을 주어서 test를 진행할 수 있는데.. 이건 pytest 관련된 부분이니 패스!
2023.07.25 - [Flask] - Flask 이용한 웹사이트 제작기 (9) - 배포
Flask 이용한 웹사이트 제작기 (9) - 배포
마지막 듀토리얼! 웹사이트를 제작을 했으니, 이제 배포를 해야하지 않겠는가? 물론 고사양 서버는 없지만, 여기서 실제로 배포를 한 후 핸드폰으로 접속해보는 정도는 가능할 듯 하다. 그것을
donot-simsim.tistory.com
'Flask' 카테고리의 다른 글
| Flask 이용한 웹사이트 제작기 (9) - 배포 (2) | 2023.07.25 |
|---|---|
| Flask 이용한 웹사이트 제작기 (7) - blog blueprint 추가 (0) | 2023.07.23 |
| Flask 이용한 웹사이트 제작기 (6) - static file 추가 (0) | 2023.07.22 |
| Flask 이용한 웹사이트 제작기 (5) - 기본 template 구현 (0) | 2023.07.21 |
| Flask 이용한 웹사이트 제작기 (4) - auth view code 작성 (0) | 2023.07.18 |